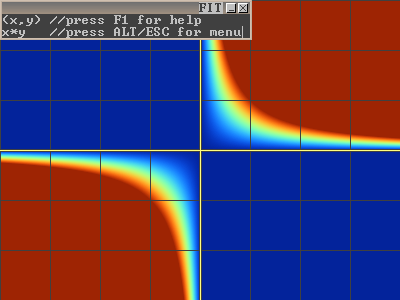
(x,y) //Press F1 for help
x*y   //press ALT/ESC for menu
This tutorial is only meant to get you started. It does not cover every aspect of programming. Once you learn the basics, the hope is that you will be inspired to discover your own tricks. For a complete list of EVALDRAW functions, refer to EVALDRAW.TXT.
If you haven't already done so, please download a copy of EVALDRAW. You can run EVALDRAW.EXE directly out of the ZIP file, however if you do so, the program will not find any of its data files. In order to use the demos, you'll need the extract the ZIP file to a new folder. Make sure to extract it with subdirectories. To enter EVALDRAW, double-click EVALDRAW.EXE. When it starts, you'll see a window that looks like this:
(x,y) //Press F1 for help x*y //press ALT/ESC for menu |
|
At the top-left, you see a small grayish window with some text. This is the default program. By default, EVALDRAW starts with a window size of 800x600. To save space, we have reduced the screenshots in this tutorial to half size. Also, to the left of each screenshot, we provide a copy of the program so you can easily copy & paste the samples.
For this tutorial, we'll be writing a new program from scratch, so first clear out the default program. Highlight the text and press delete - just like you do in a regular text editor. The background will turn black - as there is no longer a program. Then in the text window, type:
cls(255,0,0); |
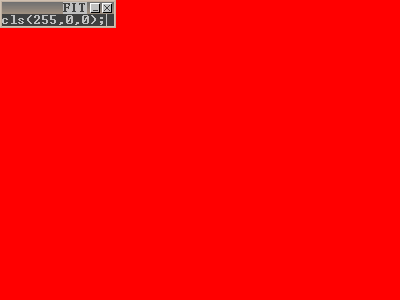 |
The background turns red. 'CLS' is an abbreviation for Clear Screen. Its function is to set the entire background to some color. The numbers inside the () are called parameters, and they tell how much red, green, and blue (respectively) to use in the screen color. Parameters must be separated with commas, and for the cls() function, they range from 0 to 255, 255 being the brightest. (If you're familiar with hexadecimal numbers, you can also write: cls(0xff0000); )
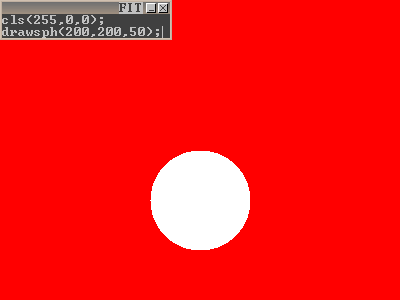
Now let's draw a circle:
cls(255,0,0); drawsph(200,200,50); |
 |
Notes:
Now let's change the drawing color:
cls(255,0,0); setcol(0,255,0); drawsph(200,200,50); |
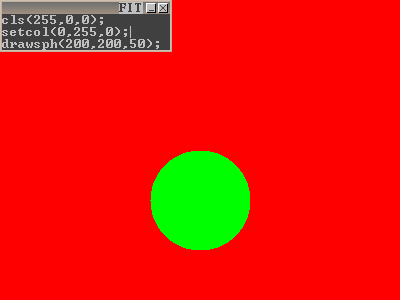 |
setcol() changes the current drawing color. It affects all future graphics functions except for CLS. Here, it changes the circle to draw as green.
Use moveto() and lineto() to draw lines. moveto() moves the pen without drawing anything. lineto() draws a line from the last pen location - either set by a previous moveto() or lineto() call.
cls(255,0,0); setcol(0,255,0); drawsph(200,200,50); moveto(100,100); lineto(300,150); |
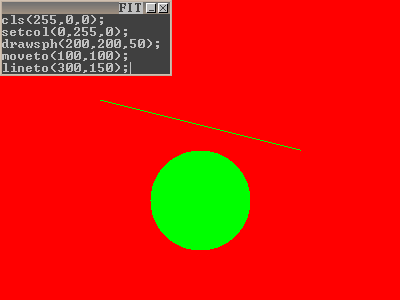 |
The line is drawn with the same color as the circle. To change the line's color, you can insert a setcol() call just before it.
Use printf() to display text:
cls(255,0,0);
setcol(0,255,0);
drawsph(200,200,50);
moveto(100,100);
lineto(300,150);
printf("Ken"); |
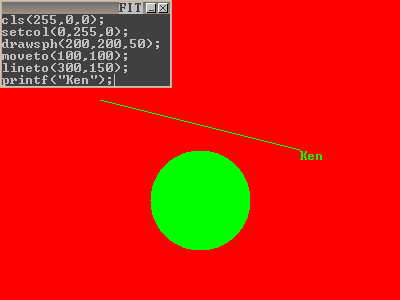 |
Unlike the other functions, printf() takes a 'string' parameter, which is a bunch of words enclosed by quotes. printf() displays text at the last position that was passed to moveto() or lineto(). Let's change its position and also increase the font size using setfont():
cls(255,0,0);
setcol(0,255,0);
drawsph(200,200,50);
moveto(100,100);
lineto(300,150);
setfont(25,40,1);
moveto(200,50);
printf("Ken"); |
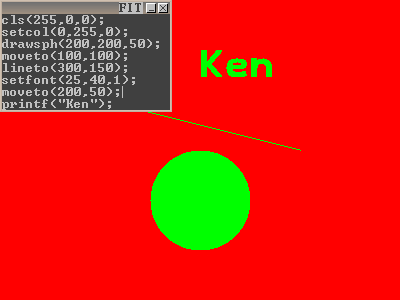 |
The first 2 parameters of setfont() control the width and height of the characters. The 3rd parameter determines whether to draw the text as open (0) or filled (1).
So far, I've shown how to draw a static scene. In this tutorial, I will show how to interact with the scene. So far, we've passed numbers as parameters to cls(), setcol(), and drawsph(). In fact, you can replace these numbers with 'variables'. A variable is a word in your code that remembers a number. The number that it holds can vary. You can make your own variables, but first I will mention some of the built-in variables of EVALDRAW:
'mousx' and 'mousy' hold the location of the mouse cursor. They are updated whenever you move the mouse. If you replace the first 2 parameters of drawsph() with mousx and mousy:
   cls(255,0,0);
   setcol(0,255,0);
   drawsph(mousx,mousy,50);
the center of the circle will now move with the mouse. Try replacing some other parameters with mousx or mousy and see what happens!
'xres' and 'yres' hold the current width and height of the EVALDRAW window. The default window size of EVALDRAW is 800x600. This can be changed by clicking the maximize button.
'bstatus' tells you which mouse buttons are currently being pressed. If no buttons are pressed, its value is 0. When only the left button is pressed, its value is 1. If the right button is pressed, it holds a 2. When the middle button is pressed, it is 4. It also supports any combination of buttons.
Suppose you want to draw the circle only when a mouse button is down. Here's how:
   cls(255,0,0);
   setcol(0,255,0);
   if (bstatus)
   {
      drawsph(mousx,mousy,50);
   }
Now here is the 'if' statement. The 'if' statement runs code conditionally - that is, it executes a block of code only if some condition is met. The 'if' statement has 2 sections:
An 'expression' is a math equation that can be simplified to a number. A simple expression is a number like 0 or 1. A more complicated expression might be: (3+4)*5 or sqrt(x)*x^2. (The sqrt() function takes the square root of the number inside it, while x^2 raises x to the 2nd power.) The 'if' statement then looks at the final value of the expression. If it's a 0, then the block of code inside the {} is skipped, and the next statement executed is the one immedately following the '}'. In all other cases, the code inside the '}' is executed. Any non-zero value (such as 1, -3, 17.32, .001) will result in the block of code inside the {} being executed (not skipped).
Suppose now you want to draw the circle when no mouse button is down. This method works for the left button:
   ..
   if (bstatus-1)
   {
      drawsph(mousx,mousy,50);
   }
   ..
Plug in 1 for bstatus and the expression (bstatus-1) simplifies to 0, causing the block of code inside {} to be skipped. Plug in 0 for bstatus, and the expression's value is -1, which is non-zero, and the circle draws. But what happens if you press a different button? Well, the circle would still draw. How you do exclude these cases? The answer is to use a comparison operator. An 'operator' is a symbol like +, -, *, and /. (These are the arithmetic operators.) Here are the comparison operators:
   ==   is equal to
   !=   is not equal to
   <    is less than
   >    is greater than
   <=   is less than or equal to
   >=   is greater than or equal to
Comparison operators always result in 1 if it's true, or 0 if it's false. Study these expressions:
   (3 < 5)              result is 1 or true
   (5 < 5)              result is 0 or false
   (3 > 5)              result is 0 or false
   (3 == 5)             result is 0 or false
   (3 != 5)             result is 1 or true
   (sqrt(9)+5 == 4*2)   result is 1 or true
   (3 - 5)              result is -2. Non-zero values are true
And this code will draw a circle when no mouse button is pressed:
   ..
   if (bstatus == 0)
   {
      drawsph(mousx,mousy,50);
   }
   ..
There is a big difference between '=' and '=='. The single '=' is used for variable assignment - we'll look at that later. For 'if' statements, you usually want to use '=='.
This example draws the circle when the up arrow is pressed:
   ..
   if (keystatus[0xc8])
   {
      drawsph(mousx,mousy,50);
   }
   ..
keystatus[] is another built-in variable. Unlike 'mousx' and 'bstatus', it has square brackets [] after the name. Inside these square brackets, you tell it which key you want to test. 0xc8 happens to be the code for 'up arrow'. Here is a list of commonly used key codes:
   0xc8:Up       0xd0:Down
   0xcb:Left     0xcd:Right
   0x2a:L.Shift  0x36:R.Shift
   0x1d:L.Ctrl   0x9d:R.Ctrl
   0x38:L.Alt    0xb8:R.Alt
   0xc9:PageUp   0xd1:PageDn
   0xc7:Home     0xcf:End
   0x52:'0' on keypad
This example draws the circle within the first 2 seconds of when the program started:
   ..
   if (klock() < 2)
   {
      drawsph(mousx,mousy,50);
   }
   ..
The klock() function returns the time in seconds. It's like a stop watch that starts as soon as the program starts. Unlike cls() and drawsph(), klock() takes no parameters, and you do not need to put a number inside its (). To restart your program, press Ctrl+Enter (You can also modify the code, but it's easier to press Ctrl+Enter if you don't intend to change anything).
This example shows how to draw the circle during the first 200 frames of your program:
   ..
   if (numframes < 200)
   {
      drawsph(mousx,mousy,50);
   }
   ..
Like klock(), numframes starts at 0 when your program begins. Instead of counting seconds, numframes counts frames. EVALDRAW increments numframes by 1 at the end of each frame. The speed of numframes depends on the speed of your machine. If your machine is fast, numframes will increase a lot faster than on a slow machine. For this reason, using numframes is not very reliable for timing. It is mainly useful for determining whether your program has just begun, allowing a convenient way to initialize variables.
This example draws the circle on random frames:
   ..
   if (rnd < 0.5)
   {
      drawsph(mousx,mousy,50);
   }
   ..
rnd is special in that it changes value every time it is accessed. It returns a random number between 0 and 1. It will be less than 0.5 half the time. To change the proportion of flickering, change the value you compare 'rnd' with.
Adding sound is easy as long as you make sure to trigger the sound once. It is a common mistake to trigger a sound on every frame. If you do this, you will either get a horrible loud noise, or in the case of playtext(), silence - until you break the program. Here are some proper ways to play a sound:
Play sound once at the beginning of your program:
   ..
   if (numframes == 0)
   {
      playtext("hello");
   }
   ..
'numframes' is 0 only during the first frame of your program.
Play sound when you first press a mouse button:
   ..
   if (bstatus)
   {
      bstatus = 0; //This clears bstatus, causing the mouse button to be released on the next frame
      playtext("hello");
   }
   ..
Play sound when you first press down a key:
   ..
   if (keystatus[0xc8]) //is up arrow pressed?
   {
      keystatus[0xc8] = 0; //This clears the up arrow, causing it to be released on the next frame
      playtext("hello");
   }
   ..
You can trigger sounds using your own conditions too - it doesn't have to be a key press or mouse button press. These examples are just to get you started.
Here are some more examples of playtext():
   playtext("hello");
   playtext(",how are you?"); //put a , at the beginning to continue speech without cutting off the previous sentence
   playtext(",Normal<pitch middle='-25'/>low and<pitch middle='+50'/>high!"); //example changing pitch
   playtext(",<rate speed='10'/>I talk fast<rate speed='-20'/>or slow.");     //example changing speed
Here are some playsound() examples:
   playsound("rulinst.wav");          //play sound at full volume, normal frequency
   playsound("rulinst.wav",50,1);     //play sound at 50% volume, normal frequency
   playsound("rulinst.wav",100,2);    //play sound at full volume, double frequency
   playsound("rulinst.wav",100,0.5);  //play sound at full volume, half frequency
playsound() supports the following formats: WAV (uncompressed only), VOC, and FLAC.
Here are some playsong() examples:
   playsong("fidsong.mid",100);  //play MIDI song at full volume. Stops after 1 play.
   playsong("fidsong.mid",-75);  //play MIDI song at 75% volume. Using a negative number for volume causes playback to loop.
   playsong("fidsong.mid",0);    //stop playback of song
Usually you call playsong() at the beginning of your program. Stopping playback is optional.
We have covered some of the built-in variables of EVALDRAW, such as 'mousx' and 'xres'. Now we're going to make our own variables. The first letter of any variable name must be a letter or an underscore (_) character. After the first character, you can also use numbers. Variables must never include spaces or other weird symbols. Here are some valid variable names:
   i
   _hello
   Ken123
   Ken__123
   HorizontalCoordinateOfBall
It's good practice to keep your variable names short. Otherwise, you spend a lot of time typing (as demonstrated by my last example). Long variables names also tend to make your code harder to read.
All variables must start their life with a known value. To set a variable to some value, use an '=' sign like this:
   i = 0;                    //i is set to a value of 0
   _hello = 17.32;           //the value, 17.32, is stored in the variable, _hello
   Ken__123 = sqrt(9)+5;     //sqrt(9)+5 is 8, so an 8 is stored in ken__123
To the right of the '=' is an expression. The expression is always evaluated first. Once the value is calculated, its value is then stored in the variable name to the left of the '='. Expressions can include numbers or variables. For counting, you overwrite a variable with an expression of itself. Here are some examples:
   i = i+1;                  //replaces i with i+1. In other words, it increments i by 1
   i = i-2;                  //replaces i with i-2. Counts down in steps of 2
   i = i*2;                  //doubles the value of i
   j = (sqrt(i)+17)*i;       //sets j to some weird value
Note: to use your own variable in an expression, you must be sure to set it to something beforehand. In other words, you must write "i = <some value>;" before you can write "i = i+1;".
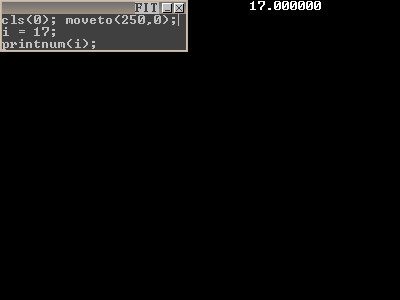
A simple way to display the value of a variable is with the printnum function:
cls(0); i = 17; printnum(i); |
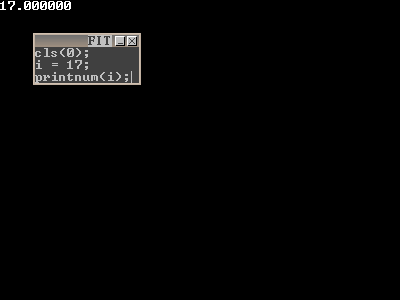 |
If you don't see anything, try dragging your text window down or to the right, as the "17.00000" may be hidden behind it. To display the text somewhere else, insert a moveto() call before it:
cls(0); moveto(250,0); i = 17; printnum(i); |
 |
(Note: that you can put multiple commands on a line. There is no restriction to the amount of space you put between each command. It's all treated the same by EVALDRAW.)
We almost know enough to make a counter. Here's a first try using what we know:
cls(0); moveto(250,0); i = 17; printnum(i); i = i + 1; printnum(i); i = i + 1; printnum(i); i = i + 1; |
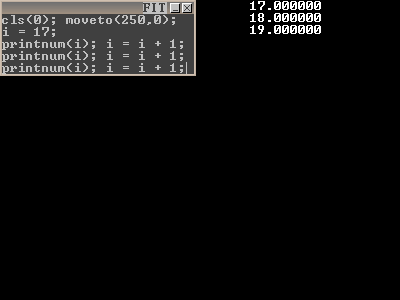 |
This code will print the numbers: 17, 18, and 19. I got tired after writing "printnum(i); i = i + 1;" for the 3rd time. To save on typing, you can repeat commands using a 'while' loop. In programming a 'loop' is something that repeats itself over and over again.
cls(0); moveto(250,0);
i = 17;
while (1)
{
   printnum(i); i = i + 1;
} |
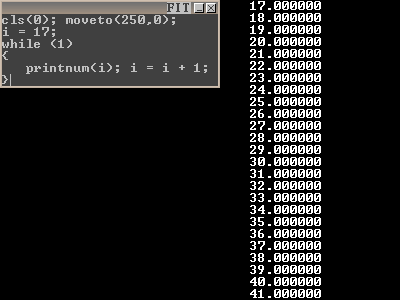 |
Now your screen is filled with numbers! The 'while' loop looks very similar to an 'if' statement. In fact it runs the same -- until it reaches the bottom of the loop (i.e. the last statement inside the block of code before the '}'). When it reaches the bottom, it test the expression at the top again. If it's still true, then it loops back up to the top '{', and runs through the block of code again. It repeats the process indefinitely as long as the condition is true. In my example, I used a '1' for the condition. Since this is always non-zero, or true, the while loop runs forever. If you put any instructions after the '}', it would never be reached!
So how do we stop the counter from going forever? We replace the expression in the 'while' with something that isn't always true:
cls(0); moveto(250,0);
i = 17;
while (i < 27)
{
   printnum(i); i = i + 1;
} |
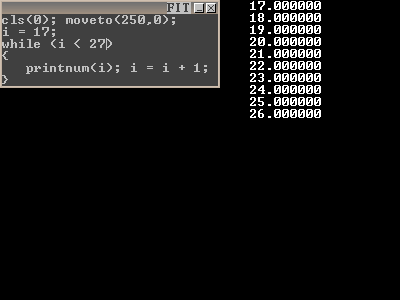 |
It starts counting at 17, and it continues until i reaches 27, at which point (27 < 27) is false, and it breaks out of the loop.
A shorter way to write a loop is with the 'for' loop. A 'for' loop takes the 3 parts of a 'while' loop:
cls(0); moveto(250,0);
for (i=17; i<27; i=i+1)
{
   printnum(i);
} |
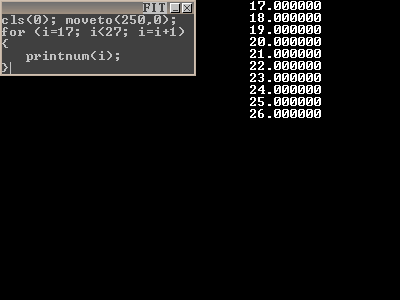 |
It counts from 17 to 26, just like the 'while' loop. To count backwards, write:
cls(0); moveto(250,0);
for (i=26; i>=17; i=i-1)
{
   printnum(i);
} |
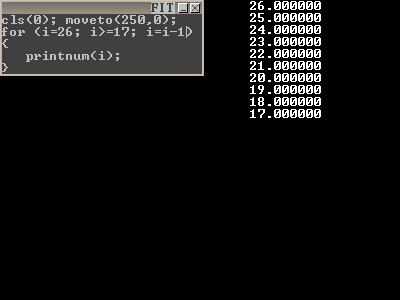 |
This 'for' loop shows how to draw a bunch of circles:
cls(0);
for (x=0;x<xres;x=x+50)
{
   drawsph(x,yres/2,25);
} |
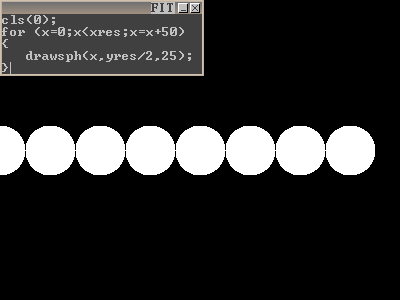 |
You can put 'for' loops inside other 'for' loops to make a 2D grid:
cls(0);
for (y=0;y<yres;y=y+50)
{
   for (x=0;x<xres;x=x+50)
   {
      drawsph(x,y,25);
   }
} |
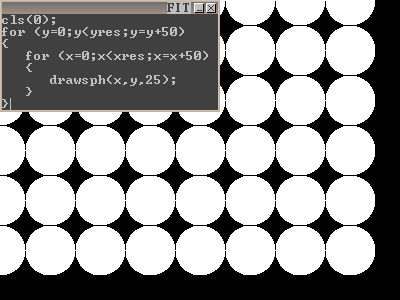 |
First the code:
x = 0; y = 0; xdir = 1; ydir = 1;
while (1)
{
   cls(0);
   drawsph(x,y,8);
   x = x + xdir;
   y = y + ydir;
   if (x > xres) xdir = -1;
   if (y > yres) ydir = -1;
   if (x <    0) xdir = +1;
   if (y <    0) ydir = +1;
   refresh();
} |
 |
There's really only one new concept here: the refresh() function. You may have noticed the while loop has an expression of '1', meaning it stays in the loop forever. It never reaches the end of the script. If your program never ends, EVALDRAW will not have a chance to update the screen. The remedy is to stick the refresh() function in the middle of your loop. refresh() tells EVALDRAW to update the screen - the same stuff it does between frames. In addition to the screen, refresh() updates the built-in variables (mousx, bstatus, keystatus[], etc..). If you remove the refresh() line, the program won't work very well.
Now I'll briefly describe of the rest of the program:
x and y hold the ball's current position. xdir and ydir tell which direction the ball is moving. I initialize the ball at the top-left corner, and start it moving down and to the right. "x = x + xdir;" moves the ball in the horizontal direction, while "y = y + ydir;" moves it in the vertical direction. If xdir is positive, the ball moves to the right. If it is negative, the ball moves to the left. Eventually, the ball reaches the right edge of the screen. To detect when this happens, I use: "if (x > xres)" and I set "xdir = -1;", which starts the ball moving to the left. Note that you can omit the {} if there is only 1 instruction in the block of code.Suppose I asked you to write a program to pick 3 random numbers, and store them somewhere for display. A naive implementation would be:
a = rnd*10;
b = rnd*10;
c = rnd*10;
while (1)
{
   cls(0); moveto(250,0);
   printnum(a);
   printnum(b);
   printnum(c);
   refresh();
} |
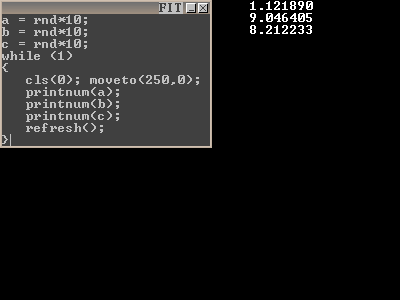 |
Now what if I asked you to generate 40 numbers instead? If you used the same method as above, that would be a lot of typing. There is an easier way: arrays. Arrays are variables that can hold more than one value in its name. This version uses an array:
static a[3];
a[0] = rnd*10;
a[1] = rnd*10;
a[2] = rnd*10;
while (1)
{
   cls(0); moveto(250,0);
   printnum(a[0]);
   printnum(a[1]);
   printnum(a[2]);
   refresh();
} |
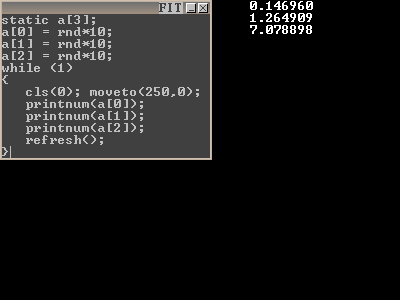 |
First, EVALDRAW must know how big your array will be. The "static a[3];" line tells EVALDRAW that 'a' is an array that must hold up to 3 variables. The variable names are: a[0], a[1], and a[2]. The number inside the square brackets is called the index. The lowest index is always 0. The highest index is always one below the maximum. In this case, the highest index is 2. An array variable is treated exactly like a regular variable - the only difference is you must put the brackets after the name, with the index inside it.
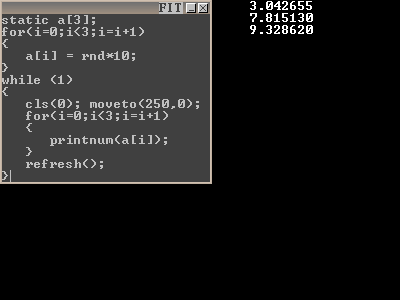
The nice thing about an array is you can use a variable as the index. Here is the same code, this time using 'for' loops for the index:
static a[3];
for(i=0;i<3;i=i+1)
{
   a[i] = rnd*10;
}
while (1)
{
   cls(0); moveto(250,0);
   for(i=0;i<3;i=i+1)
   {
      printnum(a[i]);
   }
   refresh();
} |
 |
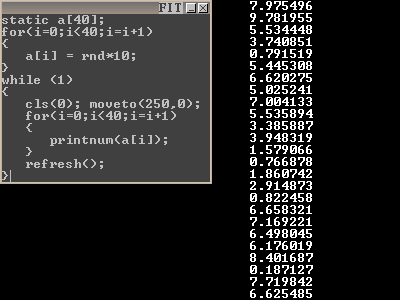
Now if we want to generate 40 numbers, all we have to do is replace the 3's with 40's:
static a[40];
for(i=0;i<40;i=i+1)
{
   a[i] = rnd*10;
}
while (1)
{
   cls(0); moveto(250,0);
   for(i=0;i<40;i=i+1)
   {
      printnum(a[i]);
   }
   refresh();
} |
 |
So far we've been using 1D arrays. Some applications, such as tic-tac-toe or battleship, work best with a 2D array. Here's how to write a 2D array:
static board[3][5];
for(y=0;y<5;y=y+1)
{
   for(x=0;x<3;x=x+1)
   {
      board[x][y] = rnd*10;
   }
}
while (1)
{
   cls(0);
   for(y=0;y<5;y=y+1)
   {
      for(x=0;x<3;x=x+1)
      {
         moveto(x*80+270,y*25);
         printnum(board[x][y]);
      }
   }
   refresh();
} |
 |
The difference between a 1D and 2D array is the number of square brackets that follow the array name. Each dimension can be declared with a different size. In this example, I made a 3x5 rectangle of memory, occupying a total of 15 memory locations. 3D and higher dimension arrays are also possible.
Before using any of the 3D graphics functions, you must first clear the 'Z-buffer'. The Z-buffer performs hidden surface removal by allowing only those objects in front to be visible on screen. To clear the Z-buffer, put this line at the top of your program:
clz(1e32);
1e32 is a very high number. It really doesn't matter what number you choose, as long as it's high enough to be deeper than than deepest object you wish to see on the screen. A good place to call clz() is right next to your cls() call. Once you have done this, you are ready to use 3D graphics.
The simplest 3D graphics function is drawsph() for drawing a sphere:
cls(0); clz(1e32); setcol(0x808080); drawsph(0,0,4,1); |
 |
The first 3 parameters are the (x,y,z) location of the center of the sphere. It is important that you select a location in front of the camera, otherwise the sphere will not appear on the screen. (0,0,0) is the default camera location, so if you want to see anything, you must push the sphere deeper into the screen. In my example, I chose a depth of z=4. The last parameter of drawsph() is the radius. I chose a radius of 1. Try playing around with the parameters to see how the sphere moves.
With drawcone(), you can draw cones or cylinders. The cone or cylinder is defined by its 2 endpoints, each endpoint being a sphere. The convex region between these 2 spheres is then filled in. It's like specifying the parameters of drawsph (x,y,z,radius) twice:
cls(0); clz(1e32); setcol(0x808080);
drawcone(-1,0,4,1,   //<- 1st (x,y,z,radius)
+1,0,4,1); //<- 2nd (x,y,z,radius) |
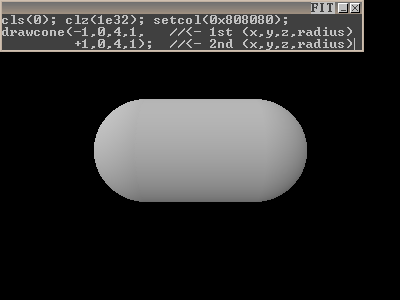 |
drawcone() is most useful for drawing thick lines or arrows. You can flatten either end by making the radius negative.
To display 3D models, use drawspr(). So far, the only supported model format is KV6. I have a KV6 editor on my website called SLAB6. Once you learn a few basic keys, it is quite easy to use. This example shows how to render a 3D model:
cls(0); clz(1e32); setcol(0xffffff);
drawspr("caco.kv6",0,0,4,1,0,0); |
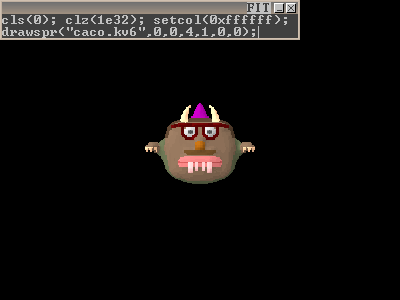 |
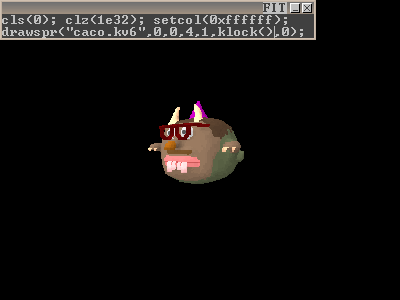
The first parameter is the filename. The next 3 parameters are the location - once again, I placed it at location (0,0,4). The next parameter is the radius - also the same as the drawsph() example. The last 2 parameters are the horizontal and vertical angles of the model. Note that these angles are in radians, not degrees. To convert degrees to radians, multiply the angle by PI/180. The following example sets the horizontal angle to be the current time. Watch what happens!
cls(0); clz(1e32); setcol(0xffffff);
drawspr("caco.kv6",0,0,4,1,klock(),0); |
 |
Finally, I'll show how to draw a polygon. A polygon can be a triangle, a rectangle, or it can have many sides. You should make it flat, otherwise it may look weird. Try this code:
cls(0); clz(1e32); setcol(0xffffff); glBegin(GL_QUADS); glVertex(-1,-1,4); //top-left glVertex(+1,-1,4); //top-right glVertex(+1,+1,4); //bottom-right glVertex(-1,+1,4); //bottom-left |
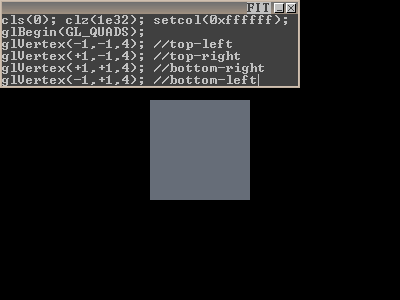 |
First, you must tell it what kind of polygon you want to draw using glBegin(). For triangles, use GL_TRIANGLES. For polygons with 4 sides, use GL_QUADS. There are other modes but these are the simplest ones. If you select GL_QUADS, then you must specify 4 vertices following it. For each vertex, you must call glVertex() with the appropriate x, y, and z coordinate. Make sure to specify the vertices in clockwise order. If you do it backwards, the polygon will be invisible!
The above example displays a blue-ish square because I left something out - the texture-mapping information. Texture-mapping allows an image to be displayed on the polygon. Textures have a different set of coordinates than what you pass to glVertex, so it may be confusing at first. In texture coordinates, location (0,0) represents the top-left corner of the image. Location (1,1) is the bottom-right corner. The basic idea is to match each corner of texture space to its corner in world space. In most cases, you use the same 4 pairs of values for texture coordinates, as shown in this example:
cls(0); clz(1e32); setcol(0xffffff); glBegin(GL_QUADS); glTexCoord(0,0); glVertex(-1,-1,4); //top-left glTexCoord(1,0); glVertex(+1,-1,4); //top-right glTexCoord(1,1); glVertex(+1,+1,4); //bottom-right glTexCoord(0,1); glVertex(-1,+1,4); //bottom-left |
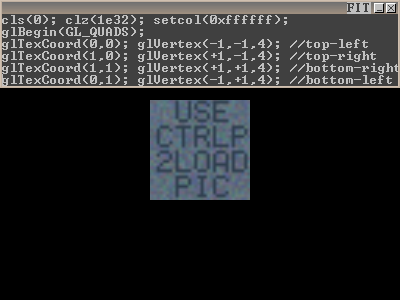 |
The glTexCoord() call must come just before each glVertex() call. This is how you specify the texture coordinate for each vertex. This example shows how to draw a polygon that is parallel to the floor:
cls(0); clz(1e32); setcol(0xffffff); glBegin(GL_QUADS); glTexCoord(0,0); glVertex(-1,+1,3); //back-left glTexCoord(1,0); glVertex(+1,+1,3); //back-right glTexCoord(1,1); glVertex(+1,+1,2); //front-right glTexCoord(0,1); glVertex(-1,+1,2); //front-left |
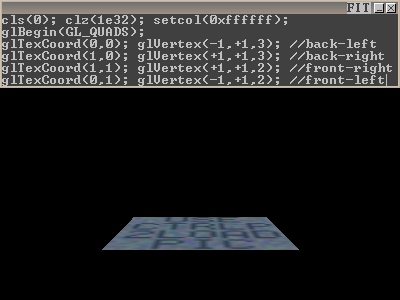 |
If you don't like the default texture (the one that says 'Use CTRLP 2LOAD PIC'), you can select your own texture using glsettex():
cls(0); clz(1e32); setcol(0xffffff);
glBegin(GL_QUADS); glsettex("wood.png");
glTexCoord(0,0); glVertex(-1,+1,3); //back-left
glTexCoord(1,0); glVertex(+1,+1,3); //back-right
glTexCoord(1,1); glVertex(+1,+1,2); //front-right
glTexCoord(0,1); glVertex(-1,+1,2); //front-left |
 |
glsettex() supports the following graphic formats: JPG, PNG, TGA, GIF, CEL, BMP, PCX, DDS.
EVALDRAW tutorial written by Ken Silverman (06/21/2008-06/26/2008), with assistance from Jim Grandpre, and Lynn Grandpre.